Configure SMS & call routing with Grafana OnCall
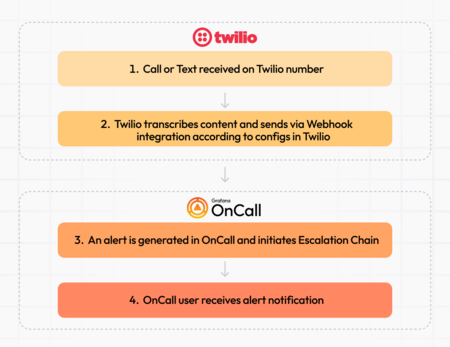
This guide walks you through how to configure a system that enables you to page on-call personnel in Grafana OnCall by calling or texting a specific phone number.
Configure the basic setup in this guide to route SMS and voice calls to OnCall using a Twilio phone number and a Webhook integration. You can further customize your configuration to send different alerts to different escalation chains based on the contents of the text or voice call.
Before you begin
To complete the steps in this guide, ensure you have the following:
- For Grafana Cloud users: A Grafana Cloud account. If you haven’t already, sign up for Grafana Cloud.
- For OSS users: Notification routing must be configured using either Grafana Cloud or a third-party provider, such as Twilio. Refer to the Grafana OnCall open source guide for more information.
- Grafana OnCall user with administrator privileges and notification settings configured.
- Twilio account: Sign up for Twilio.
Note
While OSS users have the option to use Grafana Cloud for phone and SMS routing, it is not required. If you decide to use Grafana Cloud for notification delivery, be aware that charges may apply. For more information, refer to our billing documentation.
Basic set up
In the basic set up, you’ll create an integration in OnCall and configure a phone number in Twilio. This set up allows you to receive alerts in OnCall from SMS messages or phone calls made to your Twilio phone number. We’ll expand this setup as we go.

Grafana OnCall set up
To complete the Grafana OnCall portion of the configuration, ensure you have:
- Grafana OnCall user account with administrator privileges.
- Configured notification settings for your user to test functionality along the way.
If you need to set these up first, refer to the Grafana OnCall documentation.
Set up webhook integration
Create a new integration to establish an endpoint for receiving alerts and connecting them to routes and escalation chains. The generic webhook integration accepts any payload and allows for customization of how the payload is handled in OnCall.
To create the integration:
- In Grafana Cloud, navigate to Alerts & IRM -> OnCall -> Integrations.
- Click + New Integration.
- Choose Webhook (Generic) as the integration type.
- Provide a name, description, and optionally assign it to a team.
- Note the integration URL for future use in Twilio.
Add an Escalation Chain
An escalation chain defines a sequence of notifications and other actions once an alert has been received in OnCall.
Create a simple escalation chain to directly notify your user for testing during the set up process:
- Go to Alerts & IRM -> OnCall -> Escalation chains.
- Click + New Escalation chain.
- Provide a name and click Create Escalation Chain.
- For step 1, choose Notify users and select your user.
Later, you can customize the escalation chain as needed.
Connect and test the Escalation Chain
Connect the escalation chain to the newly created integration and then test that the set up is working correctly.
- Return to the Webhook integration.
- In the integration details, under Routes, assign the new escalation chain as the Default route using the dropdown.
- Click Send demo alert and verify that you receive a notification as expected.
- Resolve the demo alert.
Next, switch to Twilio to set up the other side of the integration.
Twilio set up
A Twilio account is required to complete the steps in this section. If you haven’t already,sign up for Twilio
In this section, you’ll set up the following:
- A Twilio phone number
- Twilio Studio Flows to send information as an alert to Grafana OnCall.
Set up Studio Flow
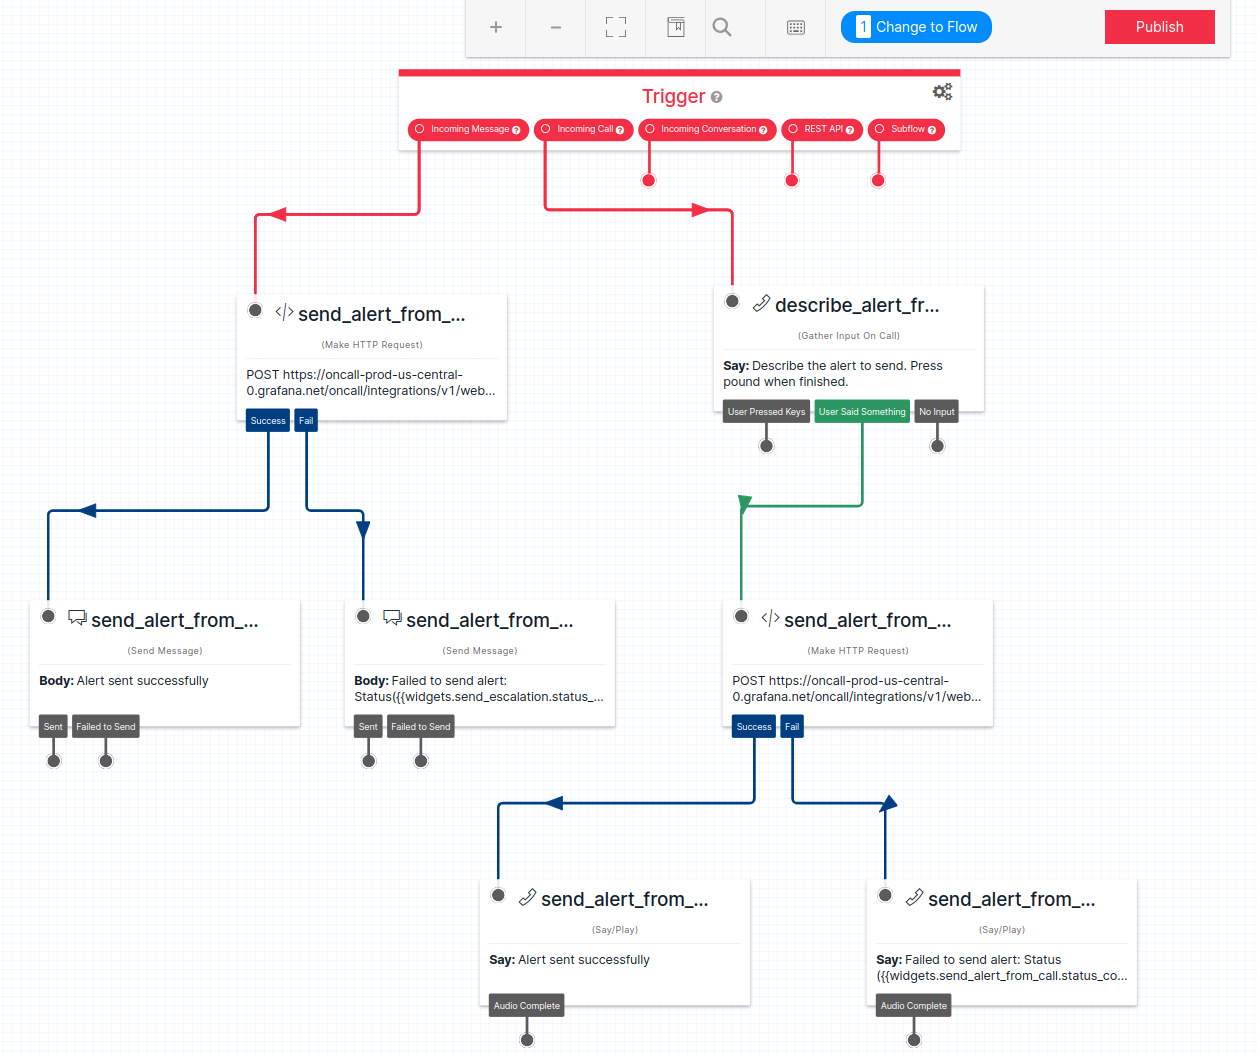
Twilio Studio flows allow you to create custom workflows to execute when a phone call or SMS message is received.
In this guide, we’ll use Twilio’s Studio Flow to capture alert information from SMS messages and phone calls to send it to Grafana OnCall:
- In Twilio, navigate to Develop -> Studio -> Flows. If Studio isn’t visible, select Explore Products and navigate to Studio under the Developer Tools section.
- Select Create new Flow, enter a Flow name, and click Next.
- Select Import from JSON and click Next.
- Import the provided JSON, which can be found in the Grafana OnCall GitHub repository.
- Replace
<YOUR_INTEGRATION_URL>(Lines 54 and 156) with the webhook integration URL from Grafana OnCall. - After adding your webhook URL, click Next.
- Review the flow and click Publish to make the flow available for use.
Understand your flow
The flow you created has two paths:
- SMS Path: Accepts incoming messages and forwards their contents to Grafana OnCall via the Webhook URL, including the sender’s phone number.
- Voice Path: Converts voice calls to text and sends them to the Webhook integration in Grafana OnCall.

Buy a Twilio phone number
Purchase a phone number in Twilio to receive calls and messages:
- Go to Develop -> # Phone Numbers -> Manage -> Buy a number. If you don’t see Phone Numbers, select Explore Products -> Super Network -> Phone Numbers.
- Search for a number in your desired country code, select one, and buy it.
- Once purchased, the number will be available in Active Numbers.
Note
Some countries and regions may require additional information to purchase a phone number such as address, contact person, etc.
Configure the phone number
Configure your Twilio phone number to use the Studio Flow you created.
- In Develop -> Phone Numbers -> Manage -> Active Numbers, select the purchased number.
- Configure Voice: Set the dropdown
A call comes intoStudio Flow. Then select the flow we created. - Configure Messaging: Set the dropdown
A message comes intoStudio Flow. Then select the flow we created. - Save the configuration.
Test and troubleshoot
Test configuration via SMS:
- Send an SMS message to the purchased number and verify that you receive an “Alert sent” success notification.
- Shortly after that, verify that you received a notification from Grafana OnCall using your configured method.
Test configuration via phone call:
- Call the purchased number, follow the instructions to describe your alert, and verify that you hear a message that the alert was sent successfully.
- Confirm that you receive a notification from Grafana OnCall using your configured method.
If you encounter issues:
- Ensure the correct integration URL is configured.
- Check the configuration of your Twilio Studio Flow. Confirm that “A message comes in” and “A call comes in” are configured correctly for the Phone number.
- Review execution logs in Twilio Studio. In Studio -> Flows, select the flow you created and view Execution Log.
- Review Grafana OnCall escalation log. Verify if an alert group was created in OnCall. If not, the alert didn’t make it to the URL. If there is an alert group, view the escalation log to review what happened.
Basic setup complete
You’ve completed the basic setup to receive alerts via SMS and phone calls in Grafana OnCall. Explore the advanced configuration section to learn how to further enhance your set up by routing alerts to different escalation chains.
Advanced SMS & call routing configuration
With the basic set up in place, you can add more optionality and automation by configuring SMS and voice calls to present a list of options to select from. The selected option then determines which route an alert is sent to in Grafana OnCall.
To accomplish this, you’ll configure an additional route and escalation chain attached to your Twilio Webhook integration in Grafana OnCall. Then, in Twilio, expand the Studio Flow to present options to the caller. This set up can be easily expanded upon to handle more routes.
Create an additional Escalation Chain
To create an escalation chain:
- Go to Alerts & IRM -> OnCall -> Escalation chains.
- Click + New Escalation chain.
- Provide a name and click Create Escalation Chain.
- For step 1, choose Notify users and select your user as the recipient. You can mark this one Important to differ from the previous one.
Later you can edit the escalation chain to match your on-call process.
Add a Route
A route in Grafana OnCall is a configurable part of an integration that enables you to specify how an alert is handled depending on it’s payload. It involves sequentially matched rules defined as Jinja2. The first rule that evaluates to true for an incoming alert payload determines how the alert is routed.
In our set up, we’ll maintain the existing escalation chain from the Basic Setup as our default route and add our newly created escalation chain to a new route.
To create a route and route alerts to the newly created escalation chain:
- Return to the Twilio Webhook integration and select Add Route.
- Click Edit template to open the template editor.
- Enter
{{ "abc" in payload.target.lower()}}to define custom logic for selecting the escalation chain based on alert content, then click Save. - Select the newly created escalation chain from the drop-down at step 3.
This template indicates that if the alert payload sent from Twilio contains the target field with a value of abc, this route will be selected.
Later, you can customize this logic to suit your specific routing needs, such as by team, service, or region.
Now Grafana OnCall can route alerts from Twilio to different escalation chains based on their content.
Add a Studio Flow in Twilio
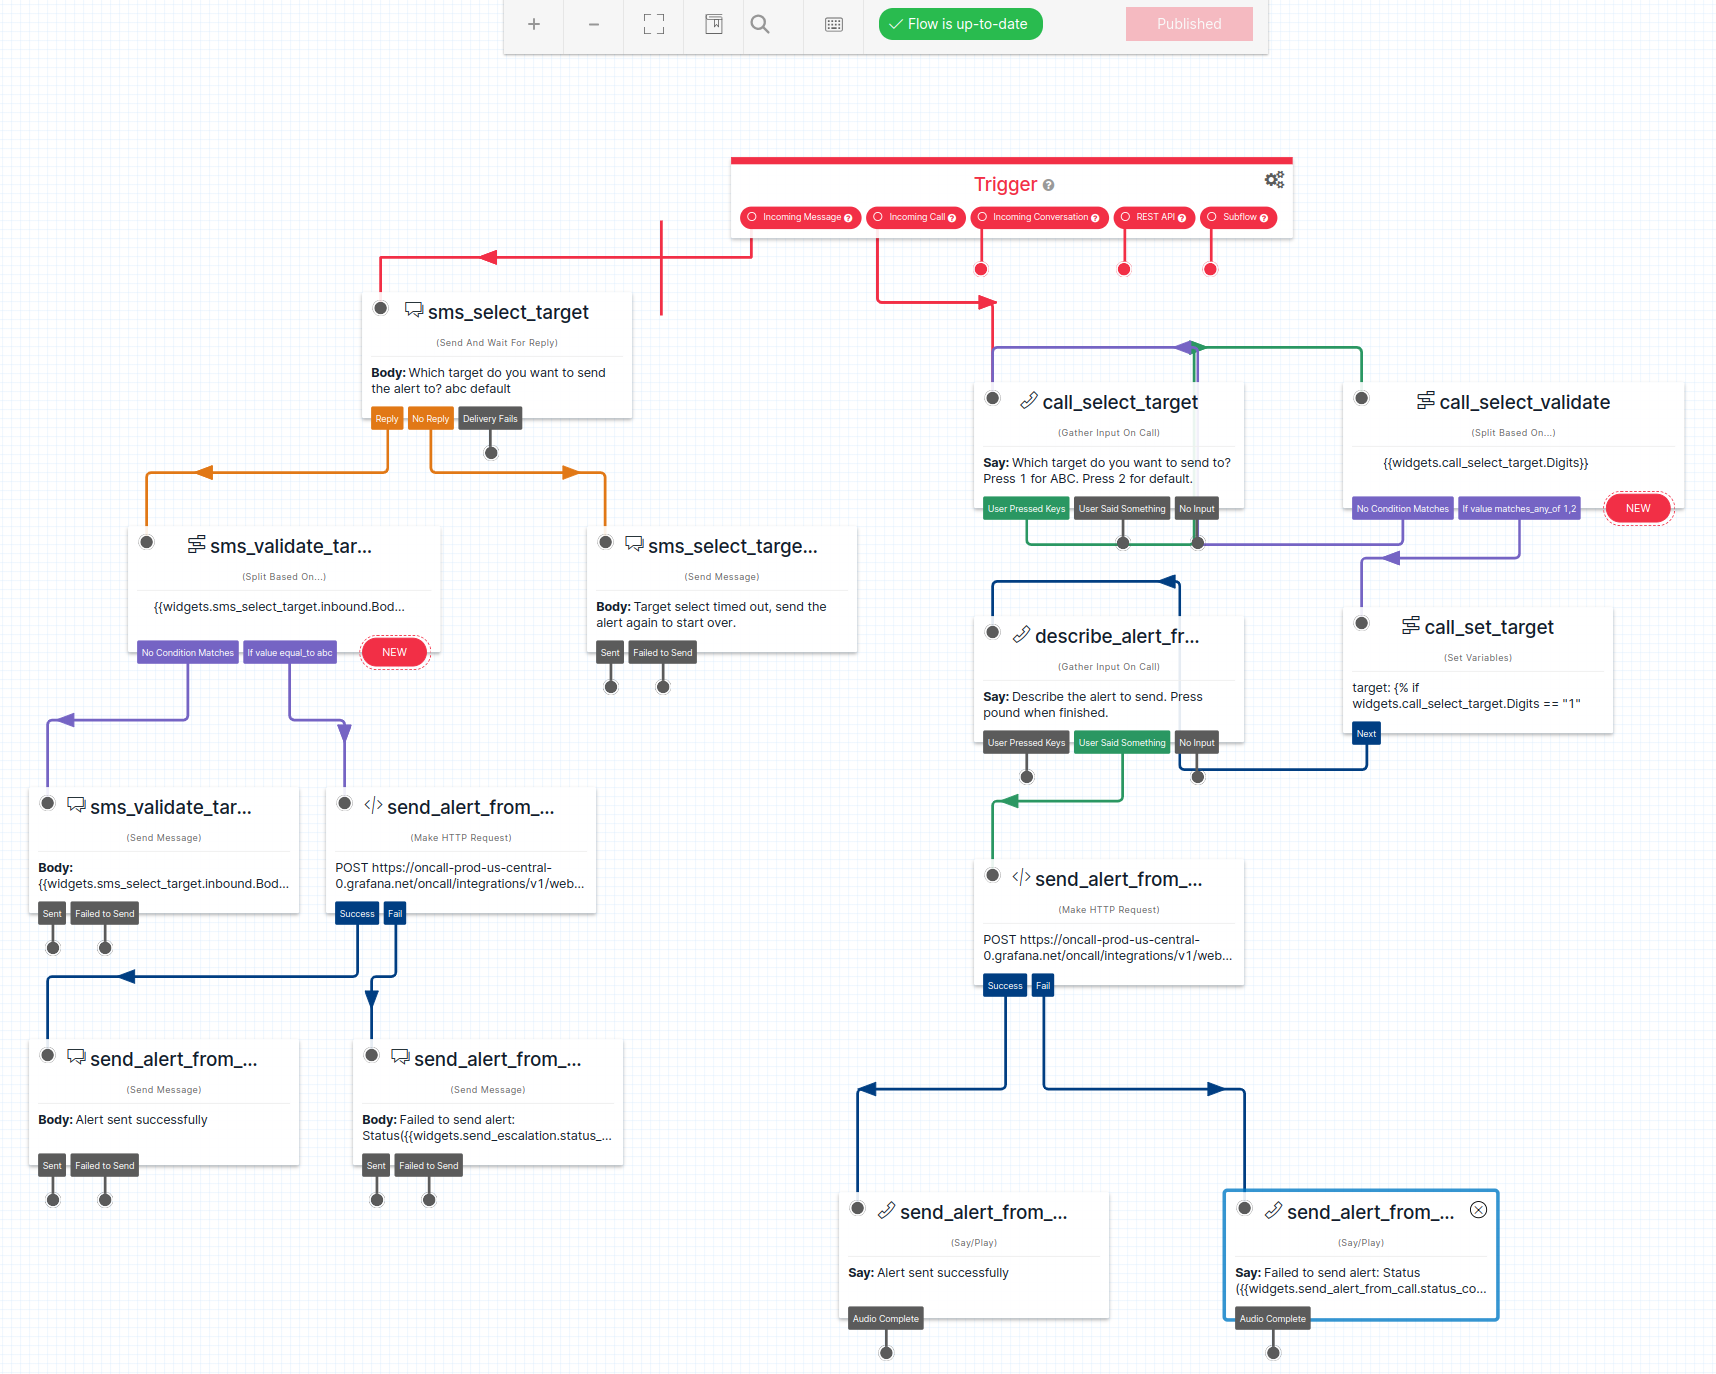
Similar to the Studio Flow created in the Basic setup, you’ll create a more complex Flow in Twilio to present options to the caller.
Create a new Flow for more complex handling:
- In Twilio, navigate to Develop -> Studio -> Flows. If Studio isn’t visible, select Explore Products and navigate to Studio under the Developer Tools section.
- Select Create new Flow, enter a Flow name, and click Next.
- Select Import from JSON and click Next.
- Import the provided JSON, which can be found in the Grafana OnCall GitHub repository.
- Replace
<YOUR_INTEGRATION_URL>(Lines 54 and 156) with the webhook integration URL from Grafana OnCall. - After adding your webhook URL, click Next.
- Review the flow and click Publish to make the flow available for use.
Understand your flow
This flow maintains the same two paths from the Basic set up while incorporating additional steps to prompt the user to specify the target for the alert and include validation checks to ensure the accuracy of provided values.
- SMS Path: Accepts incoming messages and forwards their contents to Grafana OnCall via the Webhook URL, including the sender’s phone number.
- Voice Path: Converts voice calls to text and sends them to the Webhook integration in Grafana OnCall.

Reconfigure the Twilio phone number
Update your Twilio phone number configuration to use the more complex Flow created in the previous step:
- In Develop -> Phone Numbers -> Manage -> Active Numbers, select the purchased number.
- Configure Voice: Set the dropdown
A call comes intoStudio Flow. Then select the new flow. - Configure Messaging: Set the dropdown
A message comes intoStudio Flow. Then select the new flow. - Save the configuration.
Test and troubleshoot
Test the SMS and voice call paths to verify proper routing and that you receive notifications from OnCall.
Next steps
Now that you’ve completed the initial set up, you can customize your Grafana OnCall routes and escalation chains to meet your specific routing requirements. Utilize the graphical editor available in Twilio Studio Flow to fine-tune your alert routing.


